Skill Level:
Crafting Time:
Technique(s):
Category:
Tag(s):
Share This Craft
Search Crafts
Lumps of Coal Beeswax Candles

We all know what it means when you receive lumps of coal for Christmas: you ended up on Santa’s Naughty List. (Eeek!) So if you want to have some lighthearted fun this holiday season, give your family and close friends some “coal” candles. Both you and the recipient will get a chuckle when they open this gag gift. If you don’t want to wait until Christmas Day to give away your cool coal creations, consider giving them as party favors at a holiday gathering or an ugly Christmas sweater party!
Supplies & Tools:

- Black 16.5" x 8" beeswax sheet*
- Cotton wick*
- Cutting mat
- Metal ruler
- X-Acto
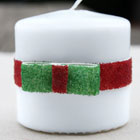
- Optional: washi tape
- Optional: hair dryer or embossing heat tool
*You can get a beeswax candle kit that includes 10 beeswax sheets and wick here or here.
Directions:
Before you begin, note that a little waxy residue will get left behind on your work surface, so make sure to put down a placemat or other protective barrier. We worked on our cutting mat, then cleaned it once we finished making candles.
- Cut beeswax sheet into 16.5" x 1" strips using your X-Acto, metal ruler, and cutting mat. Set 7 of the strips aside.

- Cut a 1.5" piece of wick, then lay the wick on the short edge of the beeswax. Wick has a top and a bottom, so make note of which end is the top by marking it with a piece of washi tape (or simply tie a knot). You want to make sure the wick is oriented correctly before you make your candle.
Note:The wick included in your candle kit should specify which end is the top. - Pinch the short edge of the beeswax around the wick.

- Begin rolling the beeswax, using even pressure as you roll the candle. Be sure that the ends stay lined up.
Note: If the beeswax is brittle, soften it with a hair dryer or embossing heat tool. Once the beeswax warms up a bit, it will be easier to roll.
- Once you’ve finished rolling the candle, gently press the end of beeswax to smooth out the edge.

- Trim the wick to 0.25".
- Repeat steps 2–6 to make additional candles.
- Place a few candles in a drawstring bag with “COAL” stenciled on it. For our bag, we used an image transfer technique to add the text to a small muslin bag.
- Now you can gift your loved ones with these charming lumps of coal!

Now that you’ve made “lumps of coal,” try these other fun beeswax candles: