


Skill Level:
Crafting Time:
Technique(s):
Material(s):
Category:
Tag(s):
Share This Craft
Search Crafts
Embossed Drink Labels

Disclosure: This article is sponsored by Sizzix®. They provided us with the Sizzix machine and dies used in this craft. All words and opinions are our own. For our full disclosure, click here.
If you’ve ever misplaced your cup at a social gathering, you’re familiar with the plight of figuring out which drink is yours. These pretty name labels are a perfect solution to prevent cup mix-ups at your next holiday party.
We don’t have anything against using a Sharpie to scribble your name on a trusty plastic cup, but labels such as these are a prettier and fancier alternative. We repurposed jars that we cleaned and saved from various food items, but you could buy a set of mason jars or use even use an inexpensive set of glasses from IKEA. Not only do the jars look nice (and are trendy right now), but they also keep your regular glasses in the cabinet, which means you don’t have to worry about one accidentally breaking.
Supplies & Tools:

- Sizzix® Big Shot Plus Machine & included Cutting Pads, Platform, & Adaptor B*
- Sizzix Bigz Die w/ Bonus Textured Impressions – Jar Labels
- Decorative cardstock with a white core
- Scissors
- Sandpaper, fine grit
- White Gelly Roll® pen or a white paint marker
- Beacon® Fabri-Tac® glue**
- Low tack tape, such as washi tape
- Glass jars (Ones with smooth, cylindrical sides are best.)
- Optional: rubber bands
*We used the Big Shot Plus machine, however, you can use the regular Big Shot machine to accomplish this craft.
**We tested several different glues and found that Fabri-Tac works the best. With Fabri-Tac, the label stays put even when the glass sweats, and the label peels off easily when you’re ready for cleanup! If you don’t have Fabri-Tac, Scotch® Quick-Dry Adhesive and Aleene’s® Jewel-It® also work well.
Directions:
- If needed, cut paper to fit the die.
- Place paper face down on the die and sandwich this between 2 cutting pads.
- Roll your “sandwich” through the Sizzix machine to die-cut the paper.
- Separate the die-cut labels from the scraps.
- Repeat steps 3–4 to die-cut as many labels as you need.
- Place two labels in the embossing folder (one on each design), using a bit tape to hold them in place. Close folder.
Note: Make sure the printed side of the paper is facing the side of the folder that has “Sizzix” printed on it.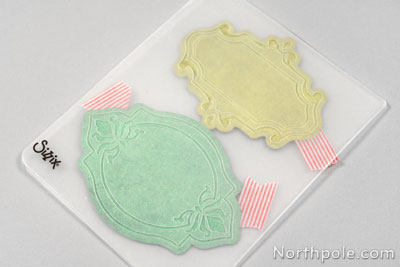
- When embossing with the Sizzix Big Shot Plus machine, you’ll need to use the platform and adaptor B (that came with your machine) in addition to the cutting pads to make your “sandwich.” Before embossing, place the pieces together in this order (from bottom to top): Platform + Adapter B + Cutting Pad + Embossing Folder + Cutting Pad. (If this sounds a bit confusing, simply refer to the “cheat sheet” diagrams that are printed on the platform and adaptor B.)
- Roll this “sandwich” through the machine. Remove your jar labels and carefully remove the tape.
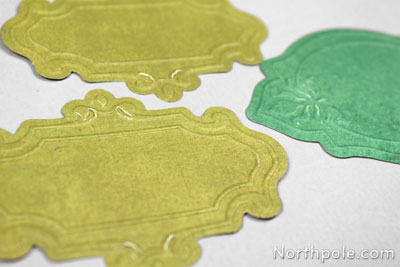
- Take a piece of sandpaper and gently sand the embossed design to show the white paper beneath the print.
Note: A sanding block is helpful here, but regular ol’ sandpaper works just fine. We found that using a skinny piece of sandpaper helped us be more careful in sanding only the embossed part.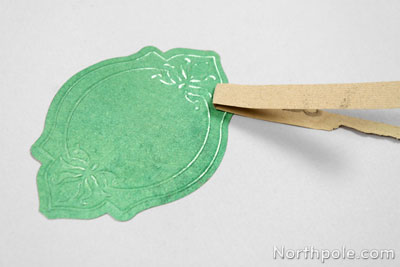
- Repeat steps 7–9 to emboss and sand each label.
- Write names on the labels with white Gelly Roll pen.
Note: If you don’t know the names of your friend’s plus-ones or prefer to have the guests write their names on the jars at the party, set out a white paint marker with the jars. It will be easier to write on a label adhered to the curved surface of a jar with a paint marker than with a Gelly Roll pen. - Before you glue the labels to the jars, make sure the names are completely dry.
- Apply a thin, horizontal line of Fabri-Tac on the back of a label. Quickly adhere the label to the jar and hold for about 45 seconds. If desired, you can use a rubber band to hold the label in place. Repeat for all your jars.
Note: Less is more, folks! If you apply too much glue, you’ll need to hold the label longer for the glue to dry. - Now your labels are all done. Fill your glass with some delicious punch and have a great time at your party!

Elfy Hint:
- When the party is over and it’s time to clean up, the labels should peel off easily. If a bit of paper does stick to the jar, simply wet it and then try again.
Idea from the Elves:
- If you’re inviting just a few guests for dinner and don’t need names on the cups, write wintery or Christmassy words instead. You could even write the names of Santa’s reindeer—just don’t forget to include Raymond!


